
Although I am not of Italian heritage, I was raised in an extended family and neighbourhood which certainly was and so I developed a strong appreciation for the culture, the language, and the FOOD from a very young age. Italian cuisine, while based on simple techniques and wholesome ingredients is vibrant and indulgent feeling, with its fine wines, rich sauces and diverse cheeses.
Best of all are the delicious melt-in-your mouth homemade pastas which are at once both the base and the star of many an Italian dish (And, as an added bonus – pasta and sauces are perfect for hiding all sorts of nutritious ingredients from picky eaters!)
However, most of us stock up on those crinkly bags of yellowed and preserved pastas and call it a day, never realising that we are missing out on one of life’s simplest and easiest to prepare healthy indulgences – homemade pasta noodles!
The basic recipe for pasta dough is laughably simple and, once prepared, can be dried and stored in canisters on the counter top for a ten minute gourmet meal any time! That’s right, while store-bought pasta takes upwards of fifteen minutes to cook the noodles after the water has already boiled, homemade noodles require a mere 2-5 minutes before you can serve them up!
Everyone has their own unique recipe, and really, it is hard to go wrong with fresh pasta. Once you learn the basics, you should experiment with your ingredients to find what suits your own preferences. Here is what works for me:
Homemade Pasta Noodles
• 3 cups flour
• 4 eggs
• ½ tsp salt
• 1 tbsp olive oil (optional; you can also use any infused oil such as lemon, truffle or hot pepper)
• fresh herbs, pureed vegetables or other ingredients for flavouring (optional)
That’s it!
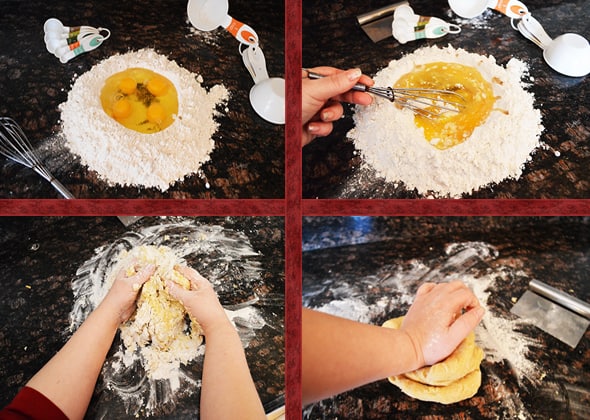
Measure out your flour and salt directly onto your clean work surface, making a valley in the centre, into which you will crack your eggs and place your oil and/or any additional ingredients you choose to include for flavour. Popular ingredients include tomato paste, spinach, or roasted peppers, and any variety of herbs or spices can add a great kick to your pasta! Just be sure to offset any extra liquid content with a reduction in your eggs and oil, and possibly a touch more flour.
Using a fork or a whisk, break open the eggs and begin to introduce the flour into the liquids, using the unintegrated flour as a wall to keep the liquids under control. When your liquids become sticky, toss your fork or whisk into the sink and use your hands to complete the mixing. Be sure to incorporate any loose bits of dough on your work surface to minimise your clean up later on!
(For those squeamish about getting your hands dirty, you can use your electric mixer with a dough blade for this step! Personally, this is my favourite part and I think it will make an excellent task for my future children to help out with!)
Once integrated, lightly dust flour across your work surface and onto your dough ball. Begin to knead the dough by forming it into a ball, then press and twist it away from you with the heel of your hand, using your other hand on top for extra support if it helps (this builds excellent arm muscles!) Fold the dough back over onto itself and repeat. If your dough is at all sticky, dust it and your hands with more flour. If your dough is too dry to properly mix, add a dash of warm water – but don’t go overboard!
By kneading the dough, you are not only mixing the ingredients better, but you are building up gluten strands which will improve the texture and taste of your pasta. Continue to knead your dough until it begins to feel smooth and elastic. This is a subtle change, which you will learn to recognise with practice; expect to knead your dough anywhere from 5-10 minutes.
At this point, I like to divide my dough using a dough scraper into six smaller balls that I flatten, which reduces the amount of setting time and also makes rolling it out easier. I let these set on the counter for about fifteen minutes, during which time I wash up the measuring cups and utensils I’ve used and set up my pasta machine.
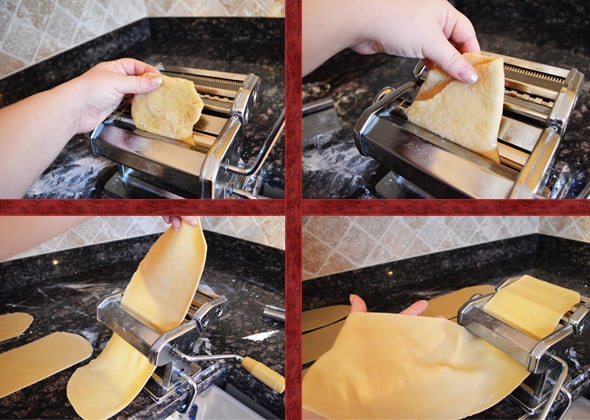
Having a pasta machine – either hand-crank or automatic – will certainly make your life easier however you can still make a variety of pastas without either. If you plan on making pasta often though, I highly recommend investing in a simple pasta machine which can roll out your dough and then further cut it into noodles – most machines include cutters for spaghetti and fettuccini but you can find a wide variety of specialty attachments for many of them.
Once your dough has set, run it through the widest setting on your pasta machine, typically “1”. Remove the flattened dough, fold it over onto itself and run it through this setting again; repeat this process four or five times, to help further strengthen your gluten strands. Do not be alarmed if your dough at this stage has holes in it, clumps up, or is ragged at the edges; simply fold it back over onto itself and continue to roll it through at this setting until you have a smooth and uniform strip of dough. If your pasta is sticking at all simply sprinkle more flour onto it. Repeat this process for each of your smaller balls, then move the dial up one notch and run each strip through once. Continue this process until you reach your desired dough thickness. This will be based on both your personal preferences and on the type of pasta you want to make. For beginners’ purposes, a thickness of “5” should suffice.
If you do not have a pasta machine, simply roll out your pasta by hand using a rolling pin, and cut into noodles manually – of course, this takes a fair bit longer and requires some strong arm muscles!
Once your dough is at the correct thickness, you can use it as-is for lasagna noodles or to cut manually and shape into other types of pasta (I’ll go into greater detail another week of hand-shaped pasta!), or you can pass it once through either of your cutting attachments just as you did through the standard roller.

That’s it, you’re done! At this point, you can add your pasta noodles directly into boiling water, for a delicious meal to celebrate your culinary achievements, or you can choose to dry out your pasta overnight to have on hand for a quick but delicious meal anytime!
To dry, simply hang your pasta noodles in an undisturbed space in your kitchen, preferably over a bare counter top or towel as some may dry and break before you collect them. You can purchase drying racks from kitchen specialty stores, though I personally like to use a set of white-coated wire hangers I purchased strictly for this purpose. I slide the noodles over the bottom wire of the hanger and simply hang them from a top cupboard handle!
When they are completely dry (depending on the humidity in your home, this could take up to 24 hours) store your noodles in an airtight container. Err on the side of caution to be absolutely certain that your pasta noodles are dry, because any amount of moisture will breed mould once stored. I like to display my dried pastas in a collection of clear glass canisters on my cupboard. Dried pasta can last for 2-3 months in an airtight container – but at least in my home, it rarely makes it a couple of weeks!
Buon Appetito!
By Contributor Aleisha Bonin
What a great recipe!! Looks very fun and yummy to make!
Wow, I will be trying this out on the weekend! You make it sound very easy to make. Thanks
Oh wow 🙂 You make it sound so easy – dont ask me WHY but I thought making pasta would be very hard! Thanks for sharing and happy mothers day!
Looks so easy to prepare. I love homemade pasta just need to get me the machine!
I’d really like to try homemade pasta.you have convinced me to do so!!!