
This weekend was my Baby Shower and I am so fortunate to have had one of my dearest friends do such an incredible job at planning and hosting all of the fun and festivities for us (we chose to hold a co-ed afternoon soiree with hors d’oeuvres, hilarious games and a sweet candy bar!) For my part, I baked the ultimate Rainbow Cake and I’m going to share with you today my complete recipe and instructions!
Being an avid cake baking and decorating enthusiast, this is the cake that I have been dreaming of baking since we first chose our nursery theme, “When it rains, look for rainbows. When it is dark, look for stars.”
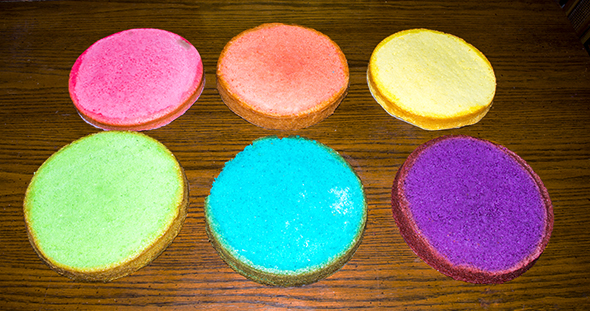
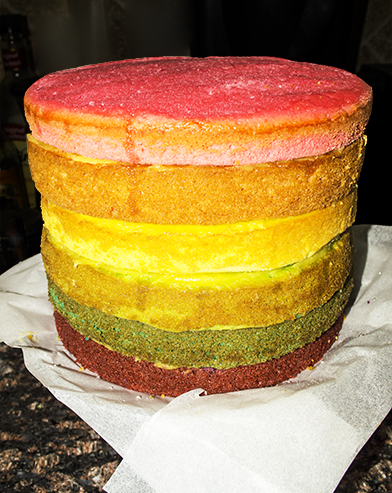
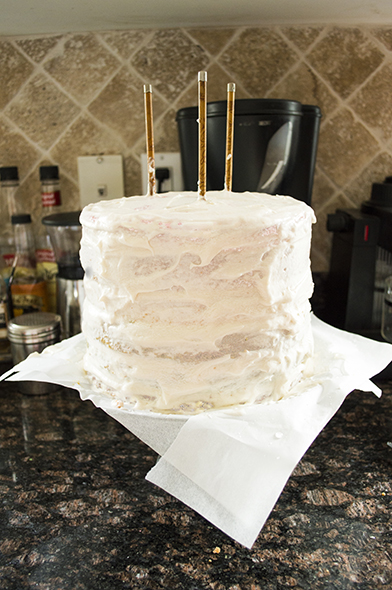
It is going to be a towering six layers tall, with each layer representing a different shade of the rainbow (we opted for simplicity by omitting an Indigo layer!) In between each layer is a simple Lemon Vanilla Filling, and the entire cake is ensconced in a crumb coating of Buttercream Frosting with a Marshmallow Fondant finish and rainbow and star decorations!
This was, as it sounds, a huge endeavour which I undertook over a span of two days – one for baking the cake and preparing the frosting, filling and fondants, and one for assembling and decorating the cake itself, so this will be a two-part post. In the first, I’ll share with you my time-honoured recipes for the cake, the filling and the frosting so that you may make this cake in its simplest form. In my next post, I’ll share with you my favourite super-simple marshmallow fondant recipe and give you a step-by step of my decorating process!
Here we go!
Baking the Cakes
Basic Golden Cake Recipe
Ingredients
- 2 cups all-purpose flour, spooned and leveled, sifted after measuring
- 1 1/4 cup sugar
- 1/2 tablespoon baking soda
- 1/2 tablespoon cream of tartar
- 1 teaspoon salt
- 1/2 cup non-hydrogenated vegetable oil margarine
- 1 cup plain unsweetened almond milk
- 1 teaspoon vanilla extract
- 2 whole eggs
Directions
Make 3 batches of Basic Yellow Cake Recipe (mixing together first the dry ingredients then adding the wet ingredients and beating until well combined). Divide each batch of batter equally into two mixing bowls. (You can mix up all three batches together at once, but then it is more difficult to measure out equal sizes of batters for each colour!)
Colour each bowl a different rainbow shade (red or pink, orange, yellow, green, blue and purple) using food colouring or your favourite natural colouring ingredients.

Grease two 8 inch round cake pans and line bottom with parchment paper cut to size. Fill pans with cake batter, tapping bottom of pans onto counter repeatedly until all trapped air bubbles have come to the surface. If some remain, pop them using a tooth pick.
Bake two cakes at a time for 25-30 minutes at 350 degrees F, being careful not to brown edges (else you lose the pretty colour effect). Test with a toothpick inserted into the centre of the cake while still in the oven; if the toothpick comes out dry, the cake is done.
Flip cakes onto a cooling rack, keeping parchment paper on bottoms to make them easier to handle without breaking. Once cooled, wrap each cake in plastic cling wrap and freeze until you are ready to assemble the cake.
Making the Lemon Vanilla Filling
Ingredients
- 6 tablespoons cornstarch
- 1 cup sugar
- A pinch of salt
- 2 cups plain unsweetened almond milk
- ½ cup non-hydrogenated vegetable oil margarine
- 1 teaspoon lemon extract (or to taste)
- ½ teaspoon vanilla extract
Directions
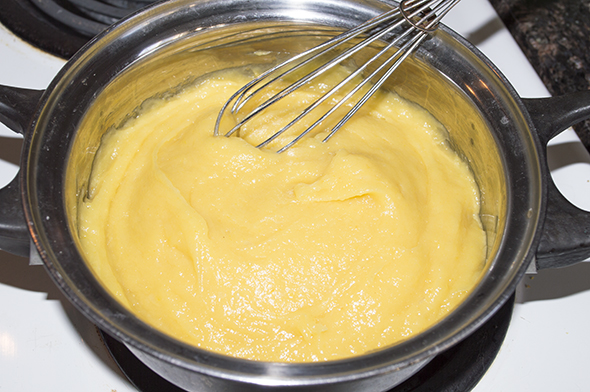
In a small bowl, combine cornstarch and two tablespoons of almond milk, mixing until well combined. Set aside until later.
Over medium heat, combine sugar and salt with the remaining almond milk in a small pot, stirring consistently until mixture is smooth and sugar is completely dissolved. Add in margarine and continue cooking until steam begins to rise, without allowing a boil.
Remove from heat and slowly add in the cornstarch mixture while whisking rapidly to ensure that no clumps begin to form. Return to low heat and continue to whisk until mixture begins to thicken to about twice the consistency of pudding.
Remove from heat and allow to cool for about 5 minutes. Add in lemon and vanilla and stir until completely integrated.
Cover bowl with plastic cling wrap and set in fridge until you are ready to assemble the cake.
Making the Buttercream Frosting
Ingredients
- 1 cup non-hydrogenated vegetable oil margarine
- 4 cups icing sugar, sifted
- ¼ teaspoon salt
- 1 tablespoon vanilla extract
- 2 tablespoons plain unsweetened almond milk
Directions
Cream together icing sugar and margarine using a spatula. Add vanilla, salt and almond milk and beat using an electric beater until light peaks form and maintain shape.
If icing is too runny, add more icing sugar slowly as needed. If icing is too thick, add in more almond milk ½ tablespoon at a time.
Cover bowl with plastic cling wrap and set in fridge until needed.
Making the Cake Moist Using Simple Syrup
Ingredients
- ½ cup sugar
- ½ cup water
Directions
Over medium-high heat, bring water and sugar mixture to a boil until sugar is completely dissolved and water is no longer cloudy. Remove from heat and set aside until ready to assemble cake.
Assembling the Cake
Place four strips of wax or parchment paper overlapping around the outside edge of your cake platter or stand to protect it from any drips or splatters of filling or frosting.
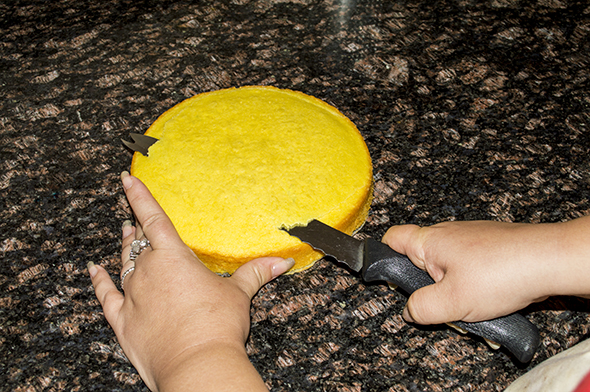
Remove each layer of the cake from the freezer and unwrap. Using a large levelling knife (you can purchase one specifically for cakes or you can simply use a large bred knife), slice off the top of each layer to ensure that they are each the same height and are as flat as possible. The extra pieces you cut off are perfect for snacking on, and can be frozen for use later in making other goodies like cake balls!)
Place the bottom layer (we chose to start with purple) on top of the wax papers, in the centre of the platter.
Using a silicone brush, apply the Simple Syrup over the entire surface of the cake layer, until the cake feels spongey to the touch. This little baker’s secret will ensure you have an incredibly moist cake every time!
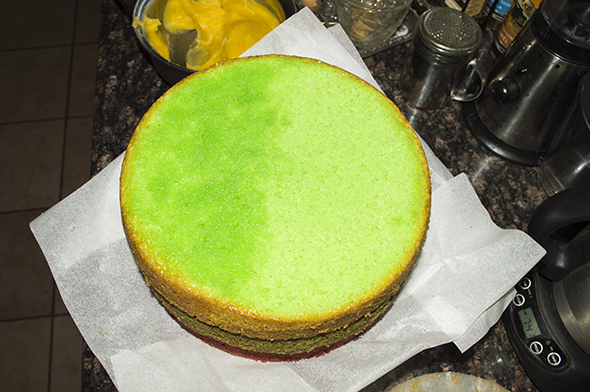
Using a large spatula, apply a thin layer of Lemon Vanilla Filling evenly across the top of the layer.
Continue to stack on each layer and repeat this process until you have a towering 6 layer rainbow cake of your own!
Because this is such a tall cake, you may find it beneficial to use skewers or chopsticks to stabilize your cake. Simply insert three or four skewers from the top to the bottom of your cake, once you have ensured that it looks even and level from all angles. You may then cover and decorate your cake using the Buttercream Frosting.
Once complete, simply pull away each of the four strips of wax paper to reveal a perfectly clean cake stand and beautiful frosting details!
If you are planning to transport your cake, or to store it in the fridge until your event, keep the skewers in and remove them only just before you are ready to put your cake on display. It should then be easy to simply pull them out and smudge a little bit of frosting over the holes.
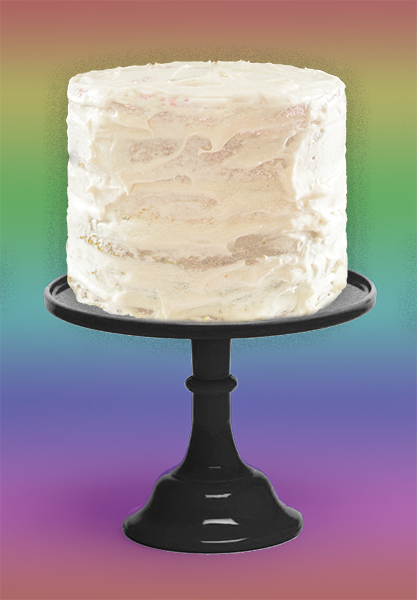
That’s it! You now have a beautiful, delicious, and surprising cake for your friends or guests to cut into that is super moist and colourful on the inside and light and cloud-like on the outside!
Stay tuned for my next recipe post, where I show you how to go one step further and cover and decorate your cakes with a yummy and very easy to make Marshmallow Fondant! Until then, keep looking for those rainbows and stars!
This is a beautiful layered rainbow cake.I t wold be so pretty and perfect for a celebration of any kind.You did a great job and thanks for sharing the recipe.
Your cake looks beautiful! Thanks for sharing the recipe and steps!